
本文用到的代码来自
https://github.com/jvanvugt/pytorch-unet
参考了论文
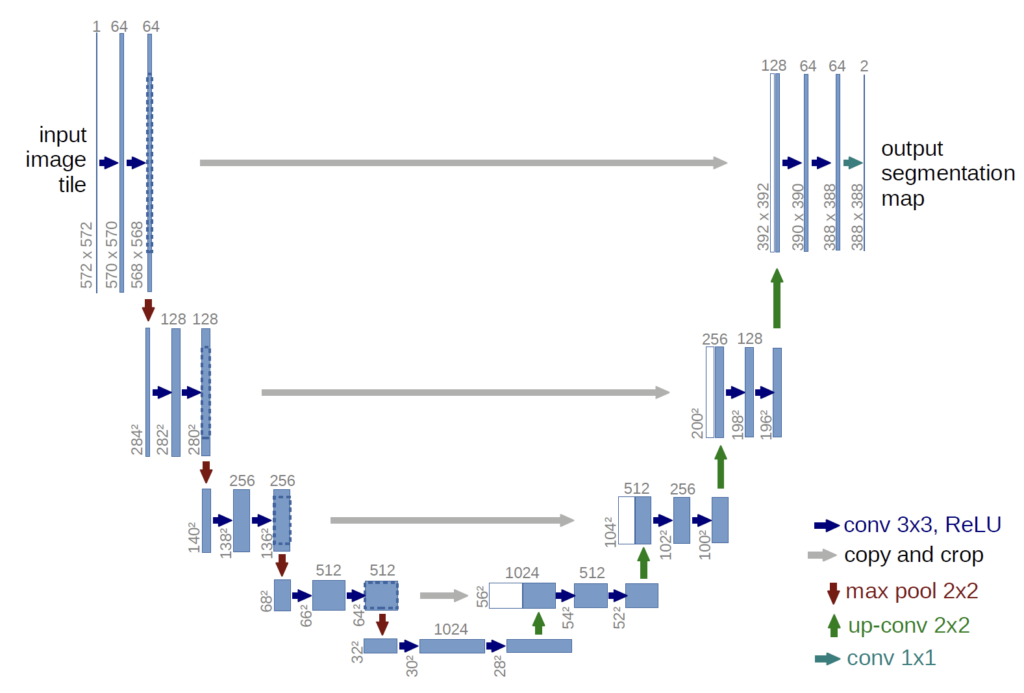
U-Net 的结构非常像一个U字,这也是其名字来源。
首先我们来看UNetConvBlock类:
class UNetConvBlock(nn.Module):
    def __init__(self, in_size, out_size, padding, batch_norm):
        super(UNetConvBlock, self).__init__()
        block = []

        block.append(nn.Conv2d(in_size, out_size, kernel_size=3, padding=int(padding)))
        block.append(nn.ReLU())
        if batch_norm:
            block.append(nn.BatchNorm2d(out_size))

        block.append(nn.Conv2d(out_size, out_size, kernel_size=3, padding=int(padding)))
        block.append(nn.ReLU())
        if batch_norm:
            block.append(nn.BatchNorm2d(out_size))

        self.block = nn.Sequential(*block)

    def forward(self, x):
        out = self.block(x)
        return out
这里没什么好说的,定义了UNetConvBlock块以及forward函数。如果batch_norm为True的话还会加入批量化归一层。使用两层 卷积有利于逐步增加非线性,让网络学习更加复杂的特征。
接下来是UNetUpBlock类,其定义了上采样层:
class UNetUpBlock(nn.Module):
    def __init__(self, in_size, out_size, up_mode, padding, batch_norm):
        super(UNetUpBlock, self).__init__()
        if up_mode == 'upconv':
            self.up = nn.ConvTranspose2d(in_size, out_size, kernel_size=2, stride=2)
        elif up_mode == 'upsample':
            self.up = nn.Sequential(
                nn.Upsample(mode='bilinear', scale_factor=2),
                nn.Conv2d(in_size, out_size, kernel_size=1),
            )

        self.conv_block = UNetConvBlock(in_size, out_size, padding, batch_norm)

    def center_crop(self, layer, target_size):
        _, _, layer_height, layer_width = layer.size()
        diff_y = (layer_height - target_size[0]) // 2
        diff_x = (layer_width - target_size[1]) // 2
        return layer[
            :, :, diff_y : (diff_y + target_size[0]), diff_x : (diff_x + target_size[1])
        ]

    def forward(self, x, bridge):
        up = self.up(x)
        crop1 = self.center_crop(bridge, up.shape[2:])
        out = torch.cat([up, crop1], 1)
        out = self.conv_block(out)

return out可以看到其中分了反卷积upconv与双线性插值upsample。其中的out = torch.cat([up, crop1], 1)
将上采样后的特征图与跳跃连接的特征图拼接。
整个的U-Net网络:
class UNet(nn.Module):
    def __init__(
        self,
        in_channels=1,
        n_classes=2,
        depth=5,
        wf=6,
        padding=False,
        batch_norm=False,
        up_mode='upconv',
    ):
        super(UNet, self).__init__()
        assert up_mode in ('upconv', 'upsample')
        self.padding = padding
        self.depth = depth
        prev_channels = in_channels
        self.down_path = nn.ModuleList()
        for i in range(depth):
            self.down_path.append(
                UNetConvBlock(prev_channels, 2 ** (wf + i), padding, batch_norm)
            )
            prev_channels = 2 ** (wf + i)

        self.up_path = nn.ModuleList()
        for i in reversed(range(depth - 1)):
            self.up_path.append(
                UNetUpBlock(prev_channels, 2 ** (wf + i), up_mode, padding, batch_norm)
            )
            prev_channels = 2 ** (wf + i)

        self.last = nn.Conv2d(prev_channels, n_classes, kernel_size=1)

    def forward(self, x):
        blocks = []
        for i, down in enumerate(self.down_path):
            x = down(x)
            if i != len(self.down_path) - 1:
                blocks.append(x)
                x = F.max_pool2d(x, 2)

        for i, up in enumerate(self.up_path):
            x = up(x, blocks[-i - 1])

return self.last(x)首先关注下采样路径self.down_path,使用depth控制U-Net的层数,用wf(width factor)控制首层通道数为2 ** wf,且后续每一层通道都加倍。用UNetConvBlock来构建每一层的卷积操作。
然后是使用F.max_pool2d进行 最大池化,让特征图缩小一半,可以减少计算量,也能给予网络更大的感受野。同时其中blocks.append(x)也建立了跳跃连接所需要的特征图。
上采样路径self.up_path,通过UNetUpBlock逐步恢复图像的空间分辨率,reversed()确保路径正确。
在最终分类层,self.last = nn.Conv2d(prev_channels, n_classes, kernel_size=1)
kernel_size = 1进行逐像素分类,最后输出形状 。
。
U-Net还有一个核心就是跳跃连接。其核心思想是:
在前向传播时,将编码器(下采样)某层的输出直接传输到解码器(上采样)相应层,并进行特征融合。
跳跃连接的核心方式如下:
在下采样路径中,每一次我们都会保留中间特征图(如果batch_norm=True,还会包含批量归一化)
![\[F_i\,=\,ConvBlock_i(F_{i-1})\]](https://www.bertzzz-horizon.xyz/wordpress/wp-content/ql-cache/quicklatex.com-d7b3df58e0783180bde0f9957941666b_l3.png "Rendered by QuickLaTeX.com")
然后用最大池化进行下采样让特征图尺寸减半
![\[{F_i}^{\prime}\,=\,MaxPooling(F_i)\]](https://www.bertzzz-horizon.xyz/wordpress/wp-content/ql-cache/quicklatex.com-249a88a75a33007965e8c0134d589bca_l3.png "Rendered by QuickLaTeX.com")
最后存储 供跳跃连接使用
![\[S_i\,=\,F_i\]](https://www.bertzzz-horizon.xyz/wordpress/wp-content/ql-cache/quicklatex.com-f2d48abaf44910e1a083e283c97180e9_l3.png "Rendered by QuickLaTeX.com")
之后在解码路径中,需要对特征图进行上采样,使其恢复到原始分辨率
![\[{F_i}^{U}\,=\,Up(F_{i+1})\]](https://www.bertzzz-horizon.xyz/wordpress/wp-content/ql-cache/quicklatex.com-ecf66bc81738029caf512d2b60db6542_l3.png "Rendered by QuickLaTeX.com")
提取出之前的 进行拼接
进行拼接
![\[{F_i}^{M}\,=\,Concat({F_i}^{U},\,CenterCrop(S_i))\]](https://www.bertzzz-horizon.xyz/wordpress/wp-content/ql-cache/quicklatex.com-1ad42ff0e842e5173a24094ee3b09e42_l3.png "Rendered by QuickLaTeX.com")
对于拼接后的特征图要进行卷积融合操作( 是两次卷积)
![\[{F_i}^{out}\,=\,C({F_i}^{M})\]](https://www.bertzzz-horizon.xyz/wordpress/wp-content/ql-cache/quicklatex.com-1e965974ad1f2e5c5b2a6399f7149403_l3.png "Rendered by QuickLaTeX.com")
然后在解码路径完成后再回到上面提到的最终分类层,用 卷积层映射到类别数。